What is FishPhone?
As the name implies, FishPhone turns your smartphone or tablet into a fully functional underwater camera monitor. Now anyone with a smartphone or tablet will get a color /black and white video image delivered right to the palm of your hand. Using Wi-Fi signal technology to create its own “hotspot”. You can share your video signal with as many friends as you like or password protect it just for yourself.
You don’t need cell phone coverage to use it, the FishPhone works anywhere in the world. To use the FishPhone App you must connect to an existing FishPhone Camera Transmitter or purchase one for App Camera yourself. The FishPhone Camera System (#FP100) is a stand alone, fully functional, smartphone controlled system that allows you to record video or still images and easily send it off to your friends in an e- mail or text. The FishPhone Camera System comes with a unique holder and battery pack system that makes it easy to carry and manage 50 feet of cable. The portable FishPhone camera pack system can power your FishPhone for six hours between charging.
The underwater camera used in the FishPhone system is a Color/ B&W camera that automatically shifts from color to black and white when light conditions are limited to increase display contrast.
Features:
- Display Type: Android / iPhone
- Cellular Coverage Not Needed
- Record Still Images and Live Video
- Full Spectrum Light Level Controls
- Portrait and Landscape Display Modes
- Compatible with Android 2.6 and Up / iOS 6 and Up
- 100 Foot Transmit Range via WiFi
- CMOS color/B&W Camera
- Rigid Carry Case Holds Cable and Battery
- 50 Feet of Lightweight Cable
- Camera Suspension Arm
- Six Hour Run Time per Charge (smartphone/tablet run time may vary)
How to Connect to the FishPhone T-BOX
iOS & Android Devices
The first time you use FishPhone on a device, you will need to configure the WiFi connection.
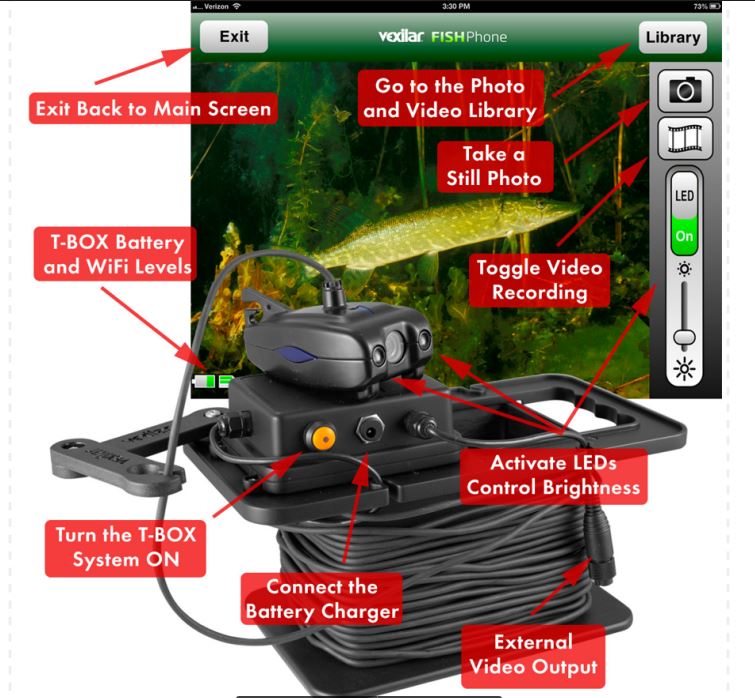
1. Start the T-BOX by pressing the power ON button. The light will turn red.
2. Go to your device's main "Settings" page.
3. Find the "WiFi" settings within. Your device will search for new signals and should find the FishPhone signal.
4. Select the FishPhone WiFi channel that appears. Enter the default password (12345678)
5. Press your devices home button, then locate and tap the FishPhone icon to start the app.
6. IMPORTANT: Tap “WiFi System Setup” and then "Change Password".
7. Enter a new password. Then exit the FishPhone app and power off the T-BOX.
8. Power on the T-BOX again and return to your devices WiFi settings page.
9. Reconnect to the FishPhone WiFi channel using your new password.
10. (Optional) Return the the FishPhone WiFi Settings Page and change the dfault WiFi channel name. Restart the app ad T-BOX, then reconnect to the new WiFi channel.
Setup is Complete. Tap "Connect Now" to begin using FishPhone.
IMPORTANT: WiFi signal range can be effected by many external factors. While good conditions allow for a 100 foot range, the actual distance you could experience may be plus or minus 20% of this distance.
Fishphone Operation
Accessing Camera Control Features
Camera LED Lighting Controls
The Camera utilizes two, super bright, white LED lights. The Camera housing has placed the lights farther from the camera lens to reduce the bounce back reflection of suspending objects in the water. This increases nighttime viewing distance and also allows the two LED lights to fill the entire 90° degree viewing angle of the camera lens.
To turn the camera's buit-in LED lighting ON, tap the LED ON/OFF Toggle button. Slide the brightness control to the right to increase the brightness as needed. Tap the ON/OFF Toggle button again to turn the LEDs OFF. The amount of LED light required will depend on the water clarity and amount of particulates in the water. Darker, stained water will require more light while clear water will allow for better light penetration, therefore decreasing the need for super bright LEDs.
Note: When you exit the FishPhone app, the LED lights automatically go OFF. Important: Be sure to check your local regulations with regard to underwater lights and camera usage.
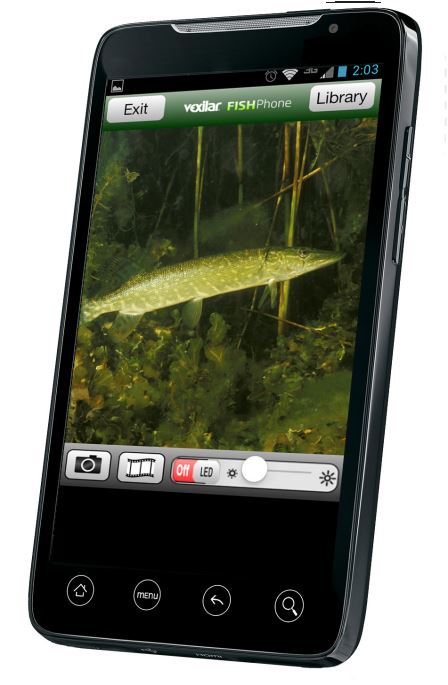
Still Image Recording
Press the Camera icon to take a snap shot of the current view. The photo is stored in your device's photo library.
Video Recording
Press the Film icon to begin recording video of the current view. The icon will blink red while video is being recorded. Tap the icon again to stop the recording. The video file is stored in your device's video library.
Accessing your Photos and Videos
To access the photos and videos you have taken with FishPhone, tap on the Libray button. This will open your device's built-in photo and video library. Choose Cancel to return to the camera view.
T-BOX Portable WiFi Underwater Camera System (FP100)
The FishPhone T-BOX Portable System (FP100) includes a convenient carrying case system in which the T-BOX is mounted to. It contains a rechargeable 12 Volt battery and camera sytem mounted to a convenient carrying case in which the camera cable is stored. This allows you to use FishPhone on a boat, off a fishing pier or under the ice without the need for the installation steps.
Turning the T-BOX On
Press the orange ON/OFF switch on the side of the T-BOX. It will light up showing the system now has power. When it starts to randomly flash, this lets you know the system is now transmitting a WiFi signal. To turn it OFF, push and hold the button briefly.
Charging the Battery
Allow the battery to warm up before charging. This makes it easier for the charger to charge the battery and the battery is more accepting of a charge.
1. Plug the charger into a wall outlet, verify that it is operating by noting the illuminated GREEN light.
2. Connect the charger to the Easy Charge Jack on the T- BOX. The charger’s light will switch to RED, indicating that it is connected correctly and the battery is charging.
3. Keep the charger plugged in and connected until the RED light has changed to GREEN. This indicates the battery is at full charge.
4. Unplug the charger from the wall outlet and disconnect from the battery.
Charging times will vary depending on how much the battery has been drained. If the battery has been completely drained the battery will require about 4 hours of charging. Once the battery is fully charged and the charger’s light returns to GREEN, the charger is then operating in a “Maintenance Mode”. At this stage, the charger can remain connected to the battery indefinitely and the battery will be maintained at full charge.
Resetting the T-BOX
When the system is ON, press the Power Switch three times, quickly within 3 seconds. The system will power OFF if the re-boot was successful. Turn it on again. Now the WiFi name and password will be back to factory default: 12345678
Using the Underwater Camera System
Open Water Usage
For open water use, simply turn the camera power ON and lower the camera into the water. If you’re drifting with the wind or using a trolling motor with the FishPhone camera, attach the supplied trolling fin to the rear of the camera for added stability.
The internal weight is enough to keep the camera down while the fin will assist in keeping the camera tracking straight through the water as the boat moves. If the camera becomes hung up on an underwater object, back up in the direction you were traveling and slowly try to back the camera out of the snag. You only want to pull directly upward with force as a last resort.
Pole Cam
There are many different uses for your underwater camera. One popular use is to use the camera to inspect boat or lower unit damage while still in the water. You can attach to the hole on the trolling fin to mount a pole or long arm.
Again, these telescopic poles are available at most hardware stores in the window cleaning or painting departments. This can make viewing in those hard to reach spots possible.
Ice Fishing Usage
The FishPhone camera is a fun way to improve your ice fishing experience and help you learn more about the underwater world below. Many anglers find that using a Vexilar Flasher along with their FishPhone camera will teach you even more about what you are seeing on your Vexilar flasher system. The FishPhone camera can be used to search for an ideal weed line or locate a rock pile where fish will generally congregate. Winter waters are often the clearest, so you are often able to easily move from hole to hole looking for some type of fish activity or change in bottom content. The FishPhone camera is designed to be easy to transport and use, so moving from hole to hole is not a problem. Once you’ve located an area where you wish to fish, use the over-the-hole suspension arm or the elbow support arm connected to the base. The supplied cable stopper (egg) will then hold your camera in perfect position.
To assist in keeping the camera at the desired depth and direction, use the adjustable egg stopper that is pre- installed on your cable. The egg locks your camera at a specific direction and depth. You can use either the elbow support arm mounted on the bottom of the case or the folding cross-hole suspension arm to hold your camera in position. Try not to bounce the camera on the bottom as it will stir-up the bottom and it may take several minutes for the cloud of dust to settle. For best results it is advised that you not actually fish in the same holes as the camera to avoid tangling in the camera cable.
Where to Buy
Vexilar has a wide network of sporting goods dealers. For a complete list and nearest location finder, please visit our dealer locator
FCC Warning Statement
Changes or modifications not expressly approved by the party responsible for compliance could void the user’s authority to operate the equipment.
This equipment has been tested and found to comply with the limits for a Class B digital device, pursuant to Part 15 of the FCC Rules. These limits are designed to provide reasonable protection against harmful interference in a residential installation. This equipment generates uses and can radiate radio frequency energy and, if not installed and used in accordance with the instructions, may cause harmful interference to radio communications. However, there is no guarantee that interference will not occur in a particular installation. If this equipment does cause harmful interference to radio or television reception, which can be determined by turning the equipment off and on, the user is encouraged to try to correct the interference by one or more of the following measures:
- Reorient or relocate the receiving antenna.
- Increase the separation between the equipment and receiver.
- Connect the equipment into an outlet on a circuit different from that to which the receiver is connected.
- Consult the dealer or an experienced radio/TV technician for help.
FCC Radiation Exposure Statement
The antennas used for this transmitter must be installed to provide a separation distance of at least 20 cm from all persons and must be co‐located for operating in conjunction with any other antenna or transmitter.
*Software Engineering by Videotech Technology Development Co., Ltd.
